The Zero Pi Model Cluster
Yes. A little late to the pi cluster game. But most of the time you have to actually do something for yourself.
Also, in starting up this project, I didn't see any full-fleshed guides on what you need to get this going, from hardware to walkthroughs. So I'll try and document my steps and missteps throughout this all.
Executive Summary (TL;DR )
The Hadoop framework was successfully installed and configured on a computing cluster of four Raspberry Pi Zeros as datanodes and one Raspberry Pi 2 (Model B v1.1). Spark was successfully installed and run on the Pi 2, but could not be configured to run on the pi Zeros due to their ARMv6 architecture. Basic test case executions were run on both frameworks to test the runtime and power usage of the cluster. Running times of simple "word count" jobs was surprisngly comparable to a professional Hadoop/Spark provider (Altiscale), on the same order of minutes per test type. The Yarn resource manager was installed and configured to monitor node and job activity. While capable of running Hadoop, the extensive difficulty in configuration outweighed the benefits of running on cheap physical devices. Frankly, I would highly recommend implementing a cluster from scratch, but have to stress to use cheap virtual instances such as those provided commercially such as through Digital Ocean, AWS, or similar academically available resources instead of the Pi.
Materials
- 5 x Raspberry Pi Zeros (of course the Zero W came out shortly after I purchased these). I got these for $5USD a piece at a Micro Center. Price may vary by location.
- 1 x Raspberry Pi 2 Model B V1.1 (Raspberry Pi Foundation)
- 5 x ADATA 16GB class 10 microSD cards (AUSDH16GCL10-RA1)$6.50USD a piece. From Amazon (naturally wouldn't ship to Canada).
- 5 x 1 ft cat5e ethernet cable (purple).$0.6USD per. From Monoprice.
- 5 x 0.5 ft USB A to micro USB B (orange).$0.9USD per. From Monoprice.
- 1 x 8-port 10/100 Mbps Ethernet Switch.$6.52USD per. From Monoprice.
- (optional) 5 x ENC28J60 Ethernet LAN Network Module.$2.05USD per. From AliExpress.
- 5 x Micro 5pin USB To RJ45 10/100M Ethernet.$1.82USD per. From AliExpress.
- 1 x StarTech 7-port powered USB hub.$12CAD. From Private sale, used.
- (optional) 1 x Power Analyzer, Watt meter, and electricity Monitor (Watts Up, Electronic Educational Devices, Aurora Colorado)
- (optional) 20 x M3.5 aluminium standoffs
- (optional) 4 x M4.5 screws

That's it! The finished cluster. Photography isn't my strong point.
1. Preliminary Setup
OS Images
Given the pi’s 1GHz single-core CPU, 512MB of RAM, and the 16GB SD storage which must be split between the OS and actual HDFS data, choosing an appropriate OS was prudent. For example, the base Raspbian Stretch (Debian-based) OS image is around 4GB, with the ‘headless’ version being around 1.2GB [1]. Further, some OSs run from RAM (e.g. Alpine Extended [2]). Finally, the BCM2835 chip on the pi is ARMv6, eliminating all of the Ubuntu ARM (ARMv7) options. Thus, an ideal situation would be low RAM usage during operation and a small disk footprint. The Debian-based DietPi v6.6 (2018-04-01) was chosen for this project due to its low RAM and SD card footprints, as well as its automatable installation option [3].
Os Installation
Each microSD card was manually loaded with the DietPi OS using an Ubuntu system. When it was determined that a Raspberry Pi 2 would be required as the namenode, it was set up similarly, except using the DietPi_ARMv7_Stretch image.
      b@bk53e $: lsblk      # my card-reader/writer is on /dev/sdf
      b@bk53e $: sudo umount /dev/sdf
      b@bk53e $: dd if=~/path/to~/DietPi_v6.6_RPi-ARMv6-Stretch.img of=/dev/sdf
OpenSSH, Vim, and Docker do not come ready on the DietPi, but can be enabled, using the DietPi automation file:
      b@bk53e $: vim /path/to/sdcard~/boot/dietpi.txt
      > AUTO_SETUP_AUTOMATED=1
      > CONFIG_BOOT_WAIT_FOR_NETWORK=2
      > AUTO_SETUP_GLOBAL_PASSWORD=MapReduce
      > AUTO_SETUP_INSTALL_SOFTWARE_ID=0   # OpenSSH
      > AUTO_SETUP_INSTALL_SOFTWARE_ID=20  # Vim
      > AUTO_SETUP_INSTALL_SOFTWARE_ID=162 # DOCKER
      > CONFIG_CHECK_DIETPI_UPDATES=0 # disable updates booting
Installation of each image was verified via SSH connection test to the device on an Ubuntu machine.
      b@bk53e $: sudo arp-scan --localnet 	# to find LAN connection IP addresses of each
      > ssh root@<\IPaddress>
Note, this was also tested on a Windows 7 machine, instead using:
      arp -a 		# to find LAN connection IP addresses of each
      > # PuTTY manual SSH
Of the five SD cards imaged, one failed to properly resize the rootFS partition and two further systems failed on their autoconfiguration. All three were re-imaged and worked properly afterwards.
Networking Setup
For convenience, hostnames were assigned by order of their connection in the ethernet switch, zpm-master, zpm-slave0, zpm-slave1, zpm-slave2, zpm-slave3 (See Appendix 2). Additionally, because the DietPi image used creates a default of MAC address of 00:e0:4c:53:44:58, eth0 MAC addresses were manually modified, to facilitate easier networking. More specifically, on my Ubuntu system, prior to changing, each node was showing up with the same IP address (10.42.0.76), though interestingly, this didn’t occur on Windows. Thus, the last octet (default: 58) was manually changed to range from 50 to 54, for each device.
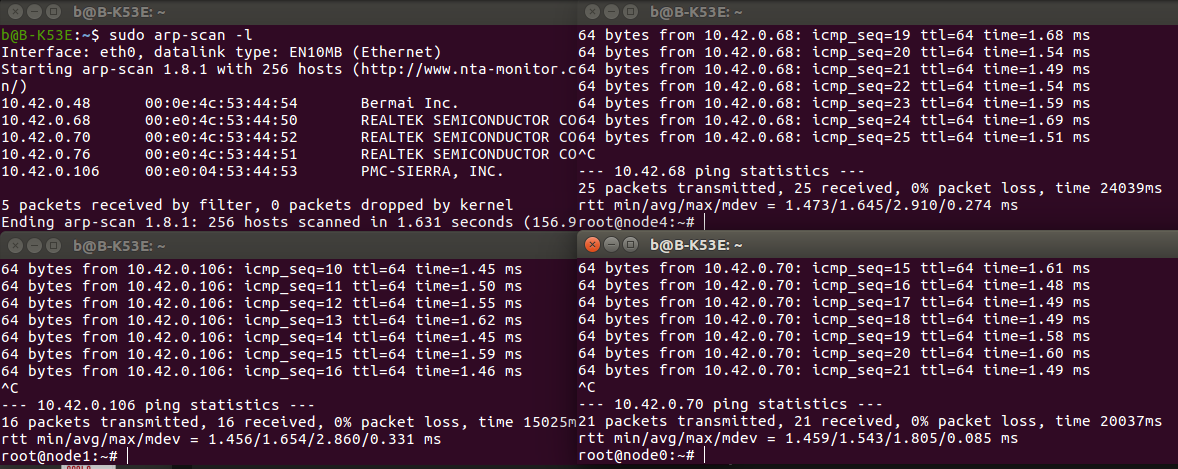
(upper left) local IP addresses of the devices, note as well the sequential MAC addresses. (left lower and both right) Three devices pinging each other successfully over the ethernet switch.
For convenience, each address|node-name pair was added to /etc/hosts for all pi’s (ex. Echo “10.42.0.68 zpm-master” >> /etc/hosts). Thus physical devices will be referred to by their hostname throughout this project.
Each device will be required to communicate with any other device, so SSH keys were generated and shared across all nodes:
    > root@zpm-master $: ssh-keygen -t rsa -b 4096
    > root@zpm-master $: ssh-copy-id root@zpm-slave0
    > root@zpm-master $: ssh-copy-id root@zpm-slave1
    > …
    > root@zpm-slave0 $: ssh-keygen -t rsa -b 4096
    > root@zpm-slave0 $: ssh-copy-id root@zpm-master
    > root@zpm-slave0 $: ssh-copy-id root@zpm-slave1
    ...
Finally, a strange omission from the DietPi image was discovered: the device will not reconnect automatically to a dropped ethernet connection. Thus, a network-monitor script has been added and is run as a cron job every 10 minutes, attempting to reconnect if the ethernet link is down (see source code for the project).
2. Software Installation
Java 8 (1.8.0_65) and scala (2.11.8) were installed on each device.
> root@zpm-master $: apt-get install oracle-java8-jdk scala -y
This is slow on the devices. Across all 5 devices running simultaneously - though sharing a single ethernet connection - installation took a little over 10 minutes on a 15Mbps internet connection.
Hadoop (2.7.5) was downloaded and installed onto only the namenode (master). The slaves will be configured later.
    root @zpm-master $: cd /opt
    > root@zpm-master $: wget https://mirror.dsrg.utoronto.ca/apache/hadoop/common/hadoop-2.7.5/hadoop-2.7.5.tar.gz
    > root@zpm-master $: tar -xvzf hadoop-2.7.5.tar.gz
    …
Then environment variables were updated to house Hadoop, adding to ~/.bashrc:
    # -- HADOOP ENVIRONMENT VARIABLES START -- #
    export HADOOP_HOME=/opt/hadoop-2.7.5
    export PATH=$PATH:$HADOOP_HOME/bin
    export PATH=$PATH:$HADOOP_HOME/sbin
    export HADOOP_MAPRED_HOME=$HADOOP_HOME
    export HADOOP_COMMON_HOME=$HADOOP_HOME
    export HADOOP_HDFS_HOME=$HADOOP_HOME
    export YARN_HOME=$HADOOP_HOME
    export HADOOP_COMMON_LIB_NATIV_DIR=$HADOOP_HOME/lib/native
    export HADOOP_OPTS="-Djava.library.path=$HADOOP_HOME/lib"
    # -- HADOOP ENVIRONMENT VARIABLES END -- #

    # -- JAVA AND SCALA HOME VARIABLES -- #
    export JAVA_HOME=/usr/lib/jvm/jdk-8-oracle-arm32-vfp-hflt/jre
And it was checked that Hadoop installed correctly:
    root@zpm-master:~# hadoop version
    Hadoop 2.7.5
    Subversion https://shv@git-wip-us.apache.org/repos/asf/hadoop.git -r 18065c2b6806ed4aa6a3187d77cbe21bb3dba075
    Compiled by kshvachk on 2017-12-16T01:06Z
    Compiled with protoc 2.5.0
    From source with checksum 9f118f95f47043332d51891e37f736e9
    This command was run using /opt/hadoop-2.7.5/share/hadoop/common/hadoop-common-2.7.5.jar
Next, the namenode was configured to refer to the hostnames of the master and datanote (slave) devices. Inside of /opt/hadoop-2.7.5/etc/hadoop:
  		> root@zpm-master $: touch master slaves
  		> root@zpm-master $: echo “zpm-master” >> master
  		> root@zpm-master $: echo “zpm-slave0” >> slaves
  		…
I prepared the HDFS into the namenode, which will be formatted once all datanodes are configured:
    > root@zpm-master: mkdir -p /opt/hadoop-2.7.5/hdfs/namenode
    > root@zpm-master: chmod 750 /opt/hadoop-2.7.5/hdfs/namenode
And defined the namenode hdfs configuration (/opt/hadoop-2.7.5/etc/hadoop/core-site.xml):
  <\configuration>
    <\property>
      <\name>fs.default.name<\/name>
      <\value>hdfs://zpm-master:9000/<\/value>
    <\/property>
    <\property>
      <\name>fs.default.FS<\/name>
      <\value>hdfs://zpm-master:9000/<\/value>
    <\/property>
  <\/configuration>
And the datanode hdfs configurations (/opt/hadoop-2.7.5/etc/hadoop/hdfs-site.xml). Note that replication was set to a sensible factor of 3, though any number up to the amount of datanodes could have been chosen, depending on desire for resiliency:
  <\configuration>
      <\property>
     	 <\name>dfs.datanode.data.dir<\/name>
     	 <\value>/opt/hadoop-2.7.5/hdfs/datanode<\/value>
     	 <\final>true<\/final>
      <\/property>
      <\property>
     	 <\name>dfs.namenode.name.dir<\/name>
     	 <\value>/opt/hadoop-2.7.5/hdfs/namenode<\/value>
     	 <\final>true<\/final>
      <\/property>
      <\property>
     	 <\name>dfs.namenode.http-address<\/name>
     	 <\value>zpm-master:50070<\/value>
      <\/property>
      <\property>
     	 <\name>dfs.replication<\/name>
     	 <\value>4<\/value>
      <\/property>
  <\/configuration>
The yarn resource manager ports were similarly configured (/opt/hadoop-2.7.5/etc/hadoop/yarn-site.xml):
  <\configuration>
      <\property>
     	 <\name>yarn.resourcemanager.resource-tracker.address<\/name>
     	 <\value>zpm-master:8025<\/value>
      <\/property>
      <\property>
     	 <\name>yarn.resourcemanager.scheduler.address<\/name>
     	 <\value>zpm-master:8035<\/value>
      <\/property>
      <\property>
     	 <\name>yarn.resourcemanager.address<\/name>
     	 <\value>zpm-master:8050<\/value>
      <\/property>
      <\property>
      	<\description>Max available cores data node.<\/description>
      	<\name>yarn.nodemanager.resource.cpu-vcores<\/name>
      	<\value>1<\/value>
      <\/property>
  <\/configuration>
And finally, the mapreduce job tracker (/opt/hadoop-2.7.5/etc/hadoop/mapred-site.xml):
  <\configuration>
      <\property>
     	 <\name>mapreduce.job.tracker<\/name>
     	 <\value>zpm-master:5431<\/value>
      <\/property>
      <\property>
     	 <\name>mapred.framework.name<\/name>
     	 <\value>yarn<\/value>
      <\/property>
  <\/configuration>
Each slave node was then setup copying the configuration of the namenode. While here, it is a good time to also set the java home environment, so Yarn and Hadoop can access it:
    > root@zpm-slave0 $: mkdir -p /opt/hadoop-2.7.5/hdfs/datanode
    > root@zpm-slave0 $: chmod 750 /opt/hadoop/hdfs/datanode
    > root@zpm-slave0 $: rmdir /opt/hadoop/hdfs/namenode
    …
    > root@zpm-slave0 $: echo “export   JAVA_HOME=/usr/lib/jvm/jdk-8-oracle-arm32-vfp-hflt/jre” >>~/.bashrc
With the master and each slave now configured to recognize the filesystem; so format the namenode.
root@zpm-master: hdfs namenode -format
Some of the output information here is notable.
  18/04/12 02:09:52 INFO util.GSet: Computing capacity for map cachedBlocks
  18/04/12 02:09:52 INFO util.GSet: VM type   	= 32-bit
  18/04/12 02:09:52 INFO util.GSet: 0.25% max memory 966.8 MB = 2.4 MB
It appears that the system is reading double the amount of memory that the pi zero has (512MB). This was fixed later when tweaking the configuration defaults (see final configuration files).
3. Hadoop
Launch and verify the cluster
    > root@zpm-master $: start-yarn.sh
    > root@zpm-master $: start-dfs.sh
As noted, the pi zero uses an ARMv6 chip, but it was here discovered that the default distributions of Hadoop for ARM chips are compiled for ARMv7 only. Thus, this will cause an error when Yarn attempts to run. The distributed file system, however, was able to run and could be examined via the namenode’s server process (10.42.0.68:50070). However, since the goal of this process is to set up a usable Hadoop/Spark cluster, and building an ARMv6 binary for yarn is well beyond the scope of this project, it was elected to proceed forward by replacing one of the pi zeros with a Raspberry Pi 3 - which has an ARMv7 CPU. Due to a lack of additional hardware and an insufficient powersource, the initial pi zero namenode was removed from the cluster.
The datanodes, however, could still be run - just only in client mode, not server. More specifically, each instance of “-server” within the datanode options, was replaced with “-client”.
      > root@zpm-slave2:/opt/hadoop-2.7.5# grep -r DATANODE_OPTS .
      > ./bin/hdfs:	HADOOP_OPTS="$HADOOP_OPTS -jvm server $HADOOP_DATANODE_OPTS"
      > ./bin/hdfs:	HADOOP_OPTS="$HADOOP_OPTS -server $HADOOP_DATANODE_OPTS"
      > ./bin/hdfs.cmd:  set HADOOP_OPTS=%HADOOP_OPTS% -server %HADOOP_DATANODE_OPTS%
      > root@zpm-slave2:/opt/hadoop-2.7.5# grep -r "\-server" .
      > ./yarn:  YARN_OPTS="$YARN_OPTS -server $YARN_NODEMANAGER_OPTS"
Thus, the Raspberry Pi 2 was set up as above, with the local IP address of 10.42.0.53, hostname = zpm-master. The 4 datanodes were re-configured with ssh-keys for the new namenode. Once set up, the hdfs was reformatted and Yarn/Hadoop could be run.
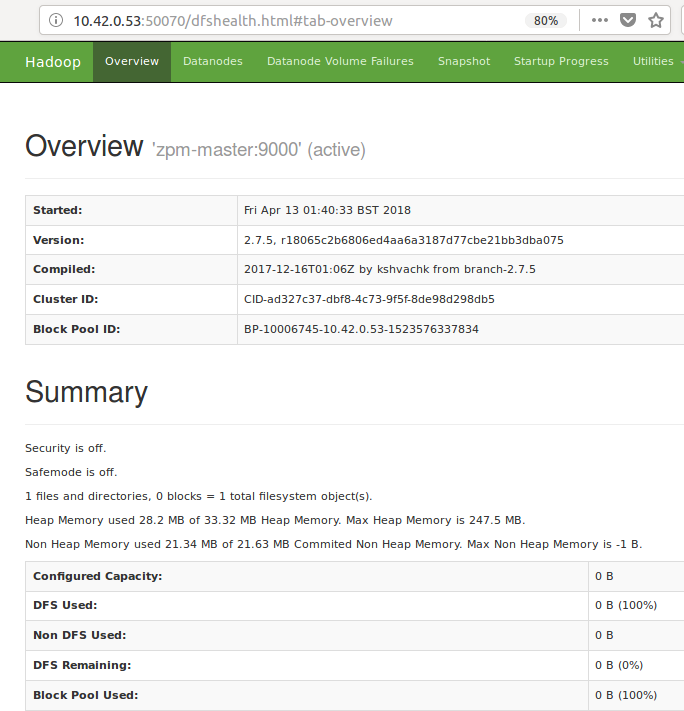
Figure: Hadoop server summary page (localhost:10.42.0.53:50070) showing start time. As no files have been loaded to HDFS just yet, it is correctly showing empty.
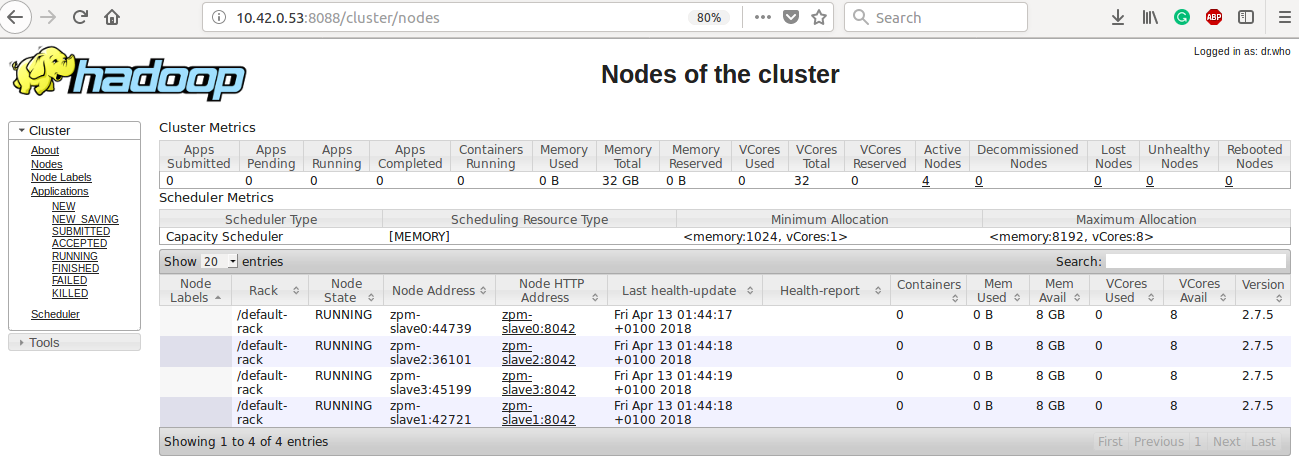
YARN server summary page (localhost:10.42.0.53:8088) showing a summary of the datanodes in the cluster. Presently each device is indicating 8GB of available memory. This is the default set by yarn, and was updated later to appropriately match the pi zero.
Tuning the Cluster
Given the 512MB of memory on the pi zeros, configuration of memory was critical to running the cluster. Checking `top` for each of the zeros showed a total memory of 492752 KiB of memory, and about 349000 KiB of free memory with just the base OS processes running. Four specific values were assigned: the yarn nodemanager resource, yarn scheduler, yarn mapreduce resource, and the map reduce memory, each of which can be seen in Figure 5 below. Nodemanager memory is set to the maximum believed that the device and handle, after accounting for the operating system, in this case 320 MB. Following, I set the yarn scheduler maximum and minimum to be 320 MB and 128 MB, respectively. Yarn app mapreduce is set to 64 MB.
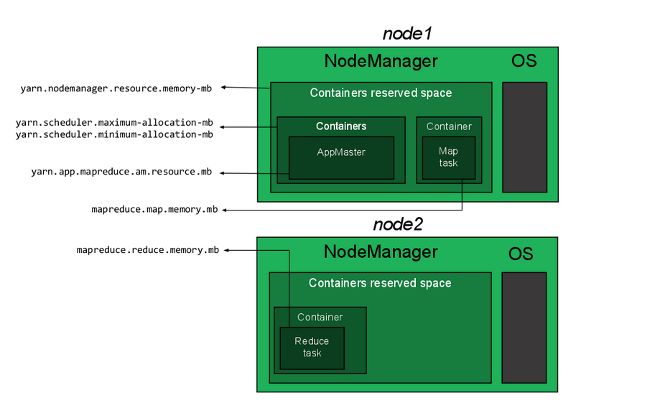
Figure: Memory allocation illustration for the nodeManager on each node in the Hadoop cluster (source: www.linode.com). The nodemanager should be the maximum reasonable amount of memory that the device can dedicate after the OS. More specifically, it is the amount reasonable for one container instance. On devices with ample memory, multiple containers can be run simultaneously. Since the pi zero is so limited, it was deemed impossible to run multiple containers at once.
Table 1. Initial Memory allocation variables for each node of the cluster. These were later all heavily modified during testing of the cluster.
| File | Property | Allocation (MB) |
|---|---|---|
| yarn-site.xml | Yarn.nodemanager.resource.memory-mb | 340 |
| yarn-site.xml | Yarn.scheduler.maximum-allocation-mb | 340 |
| yarn-site.xml | Yarn.scheduler.minimum-allocation-mb | 128 |
| yarn-site.xml | Yarn.app.mapreduce.am.resource.mb | 64 |
| mapred-site.xml | Mapreduce.map.memory.mb | 128 |
| mapred-site.xml | Mapreduce.reduce.memory.mb | 128 |
While configuring the $HADOOP_HOME/etc/hadoop/hadoop-env.sh, the java heap maximum was also set. Again This took multiple trials to determine a minimum viable amount:
    # The maximum amount of heap to use, in MB. Default is 1000.
    export HADOOP_HEAPSIZE=64
Loading files to HDFS
Multiple options exist to load data into hdfs. Here, copyFromLocal was used to load Shakespeare.txt. I’ll use it to run the first hadoop job: wordCount.
    > root@zpm-master $: cd /home & mkdir localData
		> root@zpm-master $: curl https://lintool.github.io/bespin-data/Shakespeare.txt > localData/Shakespeare.txt
		> root@zpm-master $: hadoop fs -mkdir -p /home/data
		> root@zpm-master $: hadoop fs -copyFromLocal localData/Shakespeare.txt data/Shakespeare.txt
		> root@zpm-master $: hadoop fs -ls /home/data
		> Found 1 items -rw-r--r--   3 root supergroup	5328041 2018-04-15 01:57 /home/data/Shakespeare.txt
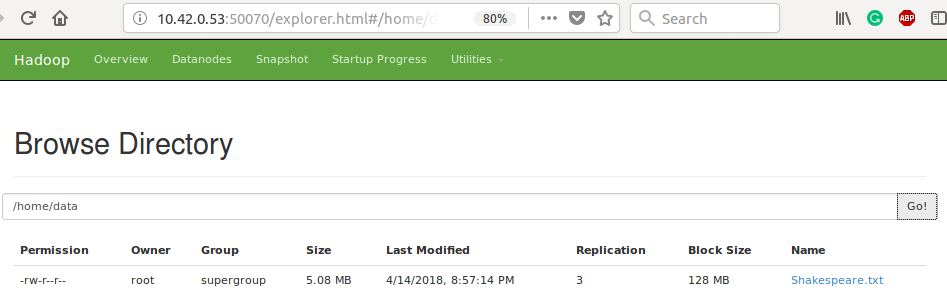
Figure: Alternatively, files can be located on HDFS via the namenode browser. Note the inefficiency of loading small files to HDFS, where a 5.08 MB text file is allocated a full 128 MB block.
Running the first Hadoop Job
The ‘hello world’ of Hadoop, on this modest cluster. Since Maven is not installed, and would only take up limited resources on the namenode, the compiled jars for all jobs were copied from the local dev laptop to the cluster.
> root@zpm-master $: hadoop jar target/1.0.jar WordCount -input /home/data/Shakespeare.txt -output wc
While running resource usage was checked via terminal `top` as well as the Yarn server. On the first run, the program did not complete, hanging for 60 minutes. Though data appeared to be transferring across the network and each slave could be ssh’d into, it appears that the namenode froze. A SIGTERM command was unable to halt the operation and the namenode could not be ssh’d into. Further, the yarn and hadoop web clients were not accessible. Graceful shutdown was attempted via `stop-yarn.sh` and `stop-dfs.sh` through one of the datanode devices. A hardboot was required on the namenode itself. It appears that the third slave node (zpm-slave2) was the fault here, however the logs on that datanode reveal nothing outstanding. Inside of hdfs-site.xml, blocksize was changed from default 128 MB to 5MB chunks. Since small files will be used, and need to minimize RAM usage, this should limit MapReduce tasks to 5 MB chunks at a time. This requires a reformat of the hdfs as well as reloading of all data to hdfs. Sadly, a second attempt at running the job lead to another seizure of the namenode. This time, yarn was being monitored immediately from job submission, to see if it showed up in the web client. The server froze before the job submission appeared. Again the logs for each node were unenlightening. A third time, instead of submitting via the hadoop command, `yarn` was attempted in place instead (i.e. $: yarn jar target/…), to similar results. Following a post on Reddit [4], I attempted some fairly drastic reconfiguration of the memory allocations for the cluster. This failed similarly. With apologies to the health of the SD card, I enabled a 4G swap partition on the namenode as outlined in a Digital Ocean posting [5].
    > root@zpm-master $: fallocate -l 4G /var/swap
    > root@zpm-master $: mkwap /var/swap
    > root@zpm-master $: swapon /var/swap
    > root@zpm-master $: echo “/var/swap none swap sw 0 0” >> /etc/fstab
Finally! The namenode does not freeze. Though, while watching `top` on the namenode during WordCount indicates a minimum of around 26 MB unused, it does indeed show around 100 MB of the swap space being utilized. Sadly however, the job fails: Exception in thread "main" java.io.IOException: No space left on device. This is despite the namenode SD card still having 4.8 GB of available space, and the overall with 45.4 GB available (`hadoop fs -df -h`). Reducing the swap size to 1G did not solve this error.
As /tmp does indeed appear to fill up during WordCount, it was remounted to 2.0G (`mount /tmp -o remount,size=2G`) to see how much gets used. Until it froze, the namenode now used up to 511 MB of space in /tmp. Again, watching `top` on the namenode, the HADOOP_HEAPSIZE was increased from 64 MB to 256 MB, allowing the job submission to get as far as initialization of the JVM metrics, where it froze again. For a final try, sysctl swappiness as set to 25, and the HADOOP_HEAPSIZE to 512MB. Thus far, job progression has not yet made it to running any of the actual data. That is, the namenode is dying simply on the startup of the JVM and its associated objects. Peaking at 644 MB in /tmp, using up the remaining ~512 MB of RAM as well as a peak of 504 MB of swap memory, the job finally finishes in the short time of 174.444 seconds. The output saves to hdfs://user/root/wc.
>root@zpm-master:/home/1.0# hadoop fs -cat /user/root/wc/part* | sort -r -k 2 -n | head
  the    27361
  and    26028
  i    20681
  to    19150
  of    17463
  a    14593
  you    13615
  my    12481
  in    10956
  that    10890
In the interest of time and exploration of possibilities of this project, it was here elected to move on to Spark, instead of testing the runtimes of the other simple jobs. One note however was that the job did not show up in the yarn server - likely a configuration oversight somewhere to be solved at a later date.
4. Spark
An unfortunate letdown
While installing Spark is actually relatively straightforward (left as an exercise for the reader), it is ultimately impossible on thead little Pi Zeros due to their ARMv6 architecture:
        > Error occurred during initialization of VM
        > Server VM is only supported on ARMv7+ VFP
Without much left to do, this is where the project ends.
Feel free to contact me with any questions about the build!
References
- [1] https://www.raspberrypi.org/downloads/raspbian/
- [2] https://www.alpinelinux.org/downloads/
- [3] https://dietpi.com
- [4] https://www.reddit.com/r/raspberry_pi/comments/5qrhc7/8_node_pi_hadoop_cluster/
- [5] https://www.digitalocean.com/community/tutorials/how-to-add-swap-on-ubuntu-14-04
- [6] https://www.sigops.org/sosp/sosp09/papers/hotpower_2_leverich.pdf
- [7] https://www.raspberrypi.org/magpi/raspberry-pi-3-specs-benchmarks/
Disclaimer
This project was submitted in a different form as a CS 651 (W2019, UWaterloo) final project.